
The Stock Replenishment Report answers what to move from one of your locations to another: for a location that gives the stock and a location to refill, it lists the items that are at or below their minimal quantity in the second one and suggests the quantity to transfer. Open it from Reports → Items → Stock Replenishment….
Filter
The Stock Replenishment Report window opens first. Fill in only the filters you need: an empty filter does not limit the report. Click OK to run the report. Clear empties the filters and sets the check boxes back to their default. The window keeps the last filter you ran.
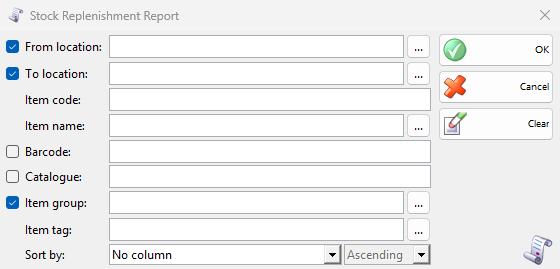
The report needs both From location: and To location:, two different locations with their full names. Press F4 or click … to choose them from the list. With one of them empty, a part of a name or the same location twice, the result is empty. The other text filters find the values that contain the text.
The check box in front of a filter puts its column in the result. A filter without a check box always has its column. Each row is one item, so a cleared check box only hides its column.
| Filter | What it limits | Column by default |
|---|---|---|
| From location: | The location that gives the stock. | Shown |
| To location: | The location to refill. | Shown |
| Item code:, Item name: | The items. | Always shown, no check box |
| Barcode:, Catalogue: | The items by barcode or catalogue number. Each adds three columns. | Not shown |
| Item group: | The items of a group. | Shown |
| Item tag: | Listed when item tags exist. It only filters. | No column |
| Sort by: | Sorts by Code or Item, ascending or descending. | – |
Results
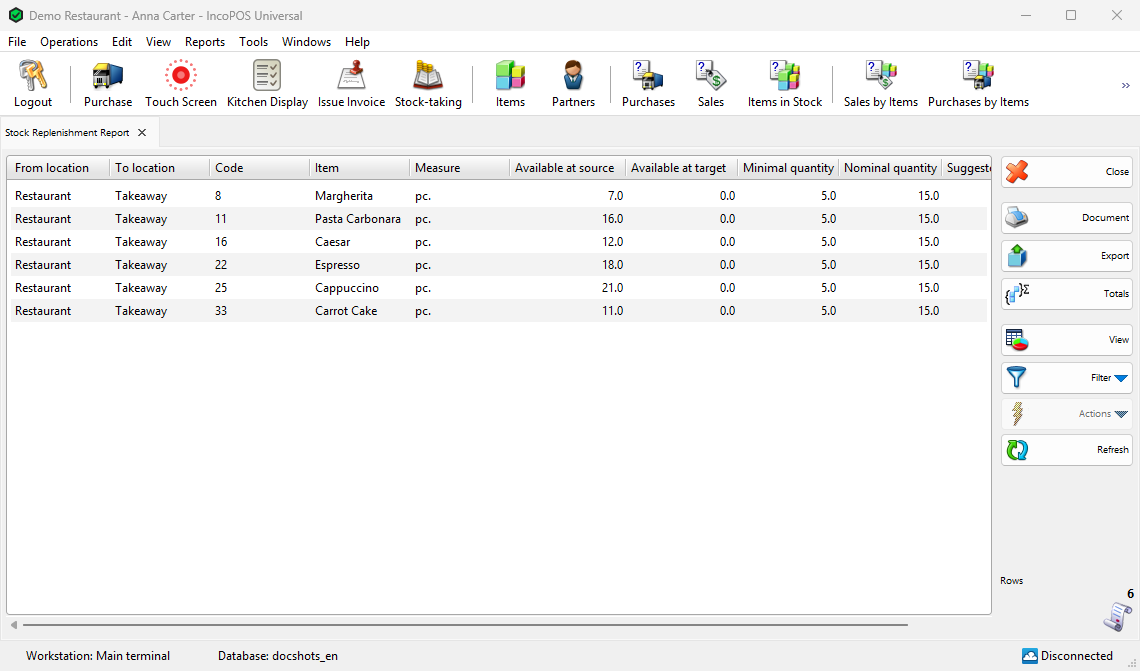
The result opens in its own tab. The example below refills one location from another, with Barcode:, Catalogue: and Item group: cleared. The first item has less stock in the giving location than is missing, so its suggested quantity is all of that stock.
| Column | What it shows |
|---|---|
| From location, To location | The two locations of the filter, on every row. |
| Item Group, Code, Item, Barcode 1 to 3, Catalogue 1 to 3, Measure | The item, as it is now in Items. Quantities are in this Measure. |
| Available at source | The stock now in the From location. |
| Available at target | The stock now in the To location. |
| Minimal quantity, Nominal quantity | The minimal and the nominal quantity of the item for the To location. |
| Suggested quantity | The quantity to transfer: up to Nominal quantity (or up to Minimal quantity when that is larger) minus Available at target, and never more than Available at source. |
How the numbers are counted
- An item is listed when Available at source is more than 0, Available at target is equal to or less than Minimal quantity, and Suggested quantity is more than 0.
- The minimal and nominal quantities come from the Location settings tab of the item for the To location. Without them, the item’s Minimal quantity: and Nominal quantity: are used (see Adding, editing and deleting items).
- An item without a minimal and a nominal quantity is listed only when its stock in the To location is below 0. The suggestion then brings it back to 0.
- The quantities are the stock now, after every saved document, all lots together. The report has no dates. Deleted items are left out.
Work with the results
Document opens the print preview of the result with its filters, and Export saves it to a file. Totals adds a row with the totals of the quantity columns. View shows the result as bars or a pie (see View Report Results). Filter → Report Filter shows the filters next to the result and runs it again as you change them, Report Filter as New… opens the result of another filter in a new tab, and Quick Filter searches the text of the rows. Refresh runs the report again. The report can also be a panel of the Dashboard.
Select the rows and use Actions → Create Transfer for Selected Items to open a new Transfer from the From location to the To location, dated today, with the selected items and their Suggested quantity. The transfer is not saved yet: check the quantities and save it. Double-click a row or use Actions → Edit to open its item. Actions → Transform Selected Items puts the selected items in another new document (see Transform Document). Actions → Print Selected Items prints their labels when a quick print setup of Print Barcodes exists.
Permissions
All permissions are set in Edit → Administration → Permissions….
| Permission | What it allows | Not allowed by default for |
|---|---|---|
| Reports → Items → Stock Replenishment… | The report. | Operators (the whole Reports menu) |
A user with a Locked location: in the user’s settings gets that location fixed in From location:. A user without Show items available quantity in these settings gets the result without Available at source and Available at target.
FAQ
Why is the result empty?
Check that From location: and To location: hold two different full location names, that the items have a minimal quantity for the location to refill, and that the giving location has stock of them.
How do I set a different minimal quantity for each location?
Open the item and set Minimal Qty and Nominal Qty for the location in its Location settings tab. The tab is hidden by default: show it with the button with the gears at the bottom left of the item window.
How do I order the items instead of moving them?
Use Items below Minimal Availability, which lists the items at or below their minimal quantity in each location and how much is missing to the nominal quantity.