
The toolbar under the menu of the main window holds buttons for the functions you use most. The Customize Toolbar window chooses these buttons, their order and how they look. Go to View → Customize Toolbar…. Each user has their own toolbar, so the change applies to the user who is logged in. To show or hide the whole toolbar, see View.
The window
The window shows “Use drag and drop to change the functions in your toolbar”. The functions of the menu are on the left and the buttons of the toolbar on the right. Every change shows at once in the toolbar of the main window, so you can see the result before you keep it.
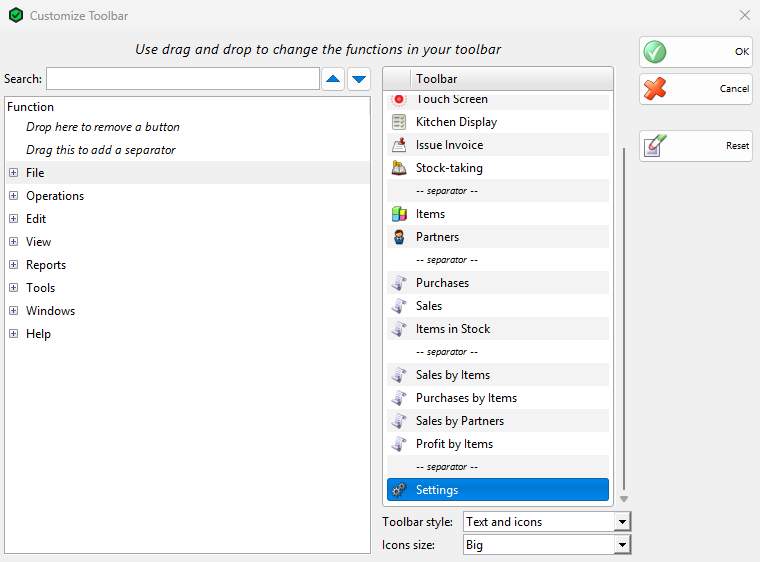
| Control | What it does |
|---|---|
| Search: | Finds a function in Function by its name. The up and down buttons go to the previous and the next match. |
| Function | The menus of the program as a tree. The items with a tick, such as Show Toolbar, are not listed. The first two rows are Drop here to remove a button and Drag this to add a separator. |
| Toolbar | The buttons of the toolbar from left to right, with their icons. — separator — is a line between groups of buttons. |
| Toolbar style: | Text, Icons or Text and icons on the buttons. |
| Icons size: | Small or Big icons. |
| OK | Saves the toolbar for the user. |
| Cancel | Closes the window and returns the toolbar as it was. |
| Reset | Puts back Text and icons, Big and the default buttons. See The default buttons. Click OK to keep it. |
Add, move and remove buttons
- Go to View → Customize Toolbar….
- To add a button, drag a function from Function to its place in Toolbar. A menu that only opens other menus, such as Payments, cannot be a button: drag one of its items instead.
- To add a separator, drag Drag this to add a separator to its place in Toolbar.
- To move a button, drag it up or down in Toolbar.
- To remove a button or a separator, drag it from Toolbar onto Drop here to remove a button.
- Choose Toolbar style: and Icons size:, and click OK.
A button stays dimmed when the user is not allowed to use its function. The permissions are set in Permissions. To give another user the same toolbar, use Copy toolbar settings in Adding, editing and deleting users.
The default buttons
A user who has not changed the toolbar, and Reset, get the buttons for the business type of the database:
| Business type | Buttons |
|---|---|
| Restaurant | Logout, Purchase, Touch Screen, Kitchen Display, Issue Invoice, Stock-taking, Items, Partners, the Purchases, Sales, Items in Stock, Sales by Items, Purchases by Items, Sales by Partners and Profit by Items reports, and Settings. |
| Hotel | Logout, the booking windows, Locations, the booking and housekeeping reports, Settings and the booking settings. |
| Other types | As for a restaurant, with Exit instead of Logout and Sale instead of Touch Screen and Kitchen Display. |
If the business type changes, for example on the Business Type card of the Setup Cards, a user who has not changed the toolbar gets the buttons of the new type. A function that is not in the program, for example without its module, gets no button.
Permissions
Customize Toolbar… is under View in Edit → Administration → Permissions…. All users can use it by default.
Troubleshooting
| Problem | Solution |
|---|---|
| A function does not stay in Toolbar when dropped. | It is a menu that only opens other menus. Open it in Function and drag one of its items. |
| A button is dimmed. | The user is not allowed to use the function. Allow it in Permissions, or remove the button. |
| Another user does not see my buttons. | The toolbar belongs to each user. Use Copy toolbar settings in the window of that user. |
| The toolbar is not shown at all. | Select View → Show Toolbar. Some windows, such as the Touch Screen, hide it, see View. |