
The Booking Plan shows the rooms as boxes laid out like the building, with a colour and small marks for what happens in each room on the selected day. The front desk uses it to see at a glance which rooms are taken, who is in the house and what is unpaid, and clicks a room to open its booking or to start a new one. It is one of the windows of Booking.
Open the Booking Plan
Go to Operations → Booking → Booking Plan. If the plan is already open, the menu returns to it, unless Allow multiple windows for new operation of the same type is on in the settings. On a reception computer, select Booking Plan in Startup page in Tools → Settings… → Special to start with it. Esc closes it.
For a user who is locked to a location, the plan opens inside the group of rooms that holds that location. Without a Pro license the plan shows the license warning the first time it opens and at every click on a room, and opens no booking.
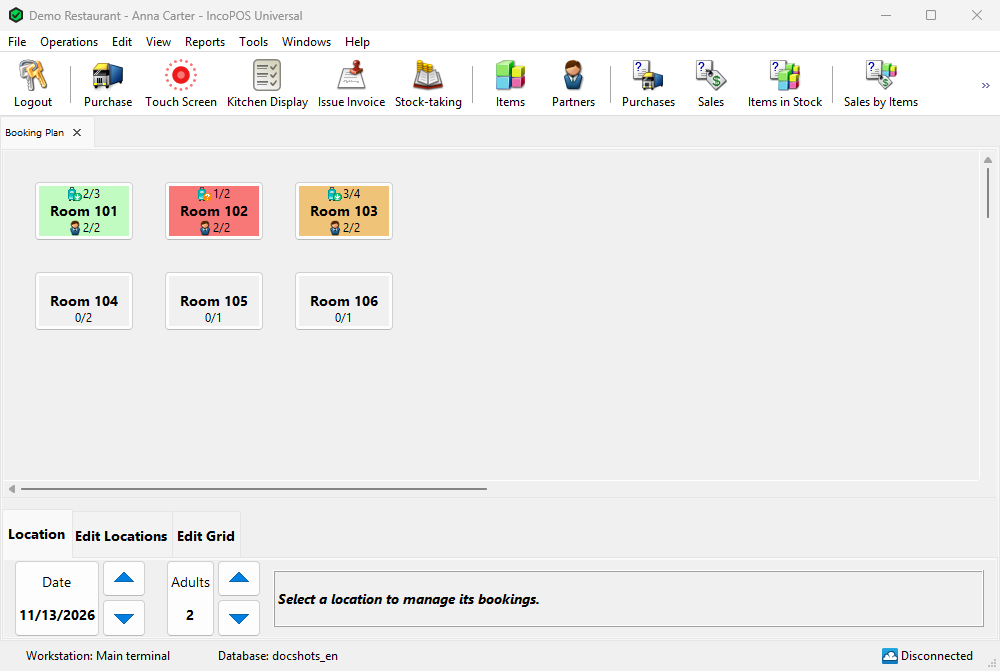
What a room box shows
Each box is a room, with its name in the middle. The box shows the booking of that room that is Arriving or In-House, or a blocking, on the date of the Location tab. A checked-out, cancelled or no-show booking leaves the room free. A box with a group icon in its top left corner is a group of rooms, for example a floor or a building.
| Mark | Meaning |
|---|---|
| No colour, 0/2 at the bottom | The room is free on that day. The number after the slash is the most adults the room takes: the maximum capacity of the room, or else that of its room type in the booking settings. |
| Arrival icon at the top | The guest has a booking and is not checked in yet. |
| Check-in icon at the top | The guest is in the house (In-House). |
| 2/3 at the top | The second night of three. With an hourly billing interval it counts hours. The departure day is not counted. |
| Guest icon and 2/2 at the bottom | The adults of the booking and the most the room takes. In dark red and bold when the booking has more adults than the room takes. |
| Red background | Nothing is paid. |
| Orange background | Part of the amount is paid. |
| Green background | The room or the whole booking is paid. |
| Light grey with the blocking icon | The room is blocked as Out Of Service. |
| Dark grey with light text and the blocking icon | The room is blocked as Out Of Inventory. |
The boxes are refreshed after a booking opened from the plan is saved, when the synchronization brings changes, and every few seconds (Rooms status refresh rate:, 10 seconds by default). The adult counts appear only when the booking settings use the number of adults.
Manage bookings from the plan
The Location tab under the plan sets the day that the boxes show and the guests of a new booking:
- Date: click it to choose a day in the calendar, or use the arrows next to it to move one day back or forward. The plan opens on today.
- Time: the hour and the minutes, in steps of 10 minutes. It appears only with an hourly billing interval and arrival and departure times.
- Adults: the adults of a new booking, from 1 to 100, 2 when the plan opens. Click it for the number pad, or use the arrows. It appears only when the booking settings use the number of adults.
Then click a room:
- A free room opens the Booking window with a new booking for that room: one night from the selected date, with the default arrival and departure times of the booking settings (14:00 and 12:00 unless changed) and the adults from the tab. Complete it, for example with the guest, and save. After saving, the booking window closes and the plan shows the room as booked.
- A booked room opens its booking in the Booking window, where you check the guest in or out, take payments or add sales. A blocked room opens its blocking in the Blocking window.
- A group opens its rooms as a tab of the plan. The close button of the tab returns to the plan above it.
Several bookings on the same day
When a room has more than one arriving or in-house booking on that day, for example a departure and an arrival, the Booking – Select Document window opens with the bookings of that room for that day. Select one and click OK. For several blockings the Blocking – Select Document window opens in the same way, with the Start and End of each blocking.
A user who is locked to a location can open only the rooms of that location or of its group: the others show “You don’t have a permission to use this location. Please contact your manager.” With cloud synchronization, a room that another database manages shows “This location is managed by another database! …” with Yes and No. After Yes the plan does not ask again for that room until it is closed. If the room cannot be used from this database at all, “This location cannot be used from the current database! …” appears.
Draw the plan
The Edit Locations and Edit Grid tabs appear for users with the Edit User Interface permission. The rooms are the locations of Edit → Locations…. When the database was created for a hotel, the setup assistant has already placed its rooms on the plan. Every change is saved at once.
| Button | What it does |
|---|---|
| Add | Opens the Add Location window. Then click the spot on the plan, select one or more locations in the list that opens and click OK. They are placed in rows from that spot. A location can be on the plan only once. |
| Remove | Click a box to take it off the plan. The location itself stays. A location with unfinished restaurant orders and a group that still has rooms cannot be removed. |
| Move | Drag a box to another place. It moves in steps of Rooms movement step:. |
| Rotate | Click a box to swap its width and height. |
| Resize | Drag a box to change its size. |
The message next to the buttons says what the next click does, for example “Select a spot for the new location.”. Click the pressed button again, or open another tab, to stop.
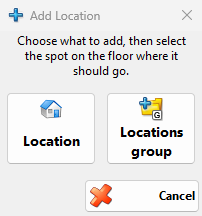
Add Location
The window asks what to add. Location adds rooms. Locations group adds a group box, for example for a floor: click the group on the Location tab to open it and add its rooms inside it. Cancel adds nothing.
Edit Grid
Each plan and each group has its own grid. Width and Height set its size, from 100 to 2000 pixels: the arrows change it by twice the movement step (at least 10), and a click on the number opens the number pad. Background opens Choose Background Image, for example for a floor plan: Open sets the image, reduced to 2000 × 2000 pixels at most, and No Image removes it.
Number pad
The Choose number window opens from Adults and from the numbers of Width and Height. Type the number with the buttons or the keyboard and click OK. A number outside the limits is set to the nearest limit.
Settings
The Bookings tab of Tools → Settings… has three settings for the plan. They are saved for each computer.
| Setting | What it does |
|---|---|
| Layout style: | The plan that this computer uses. Default is the plan of every computer that has no other one. Add new… creates another one, for example for a reception in a second building, and Remove deletes the selected one after a question. The plans are saved in the database, so the computers with the same layout style see the same plan. |
| Rooms movement step: | The step in pixels when you move a box, from 1 to 30. 10 by default. |
| Rooms status refresh rate: | How often the plan and the Booking Sheet read the bookings again, from 2 to 30 seconds. 10 by default. |
Permissions
| Permission | What it allows | Not allowed by default for |
|---|---|---|
| Booking → Booking Plan | Opening the plan | Nobody, unless the business type hides the Booking menu |
| Booking → Booking Plan → Edit User Interface | The Edit Locations and Edit Grid tabs | Operators |
| Booking → Booking | Opening and creating bookings with a click on a room. Without it a click on a room does nothing. | Nobody |
An administrator changes them in Edit → Administration → Permissions….
Troubleshooting
| Problem | Solution |
|---|---|
| “Opening the Booking Plan is not allowed!” | Ask an administrator to allow Booking Plan for your user. |
| The plan is empty | No rooms are placed yet. A user with Edit User Interface adds them on the Edit Locations tab. Check also Layout style:, which may point to another plan. |
| “The selected locations cannot be added. The locations are already in use or there is not enough place for all of them.” | The locations are already on the plan, maybe in a group, or the grid is too small from the clicked spot. Click further up and left, or make the grid larger on Edit Grid. |
| “The location “Room 101″ has orders associated with it! …” | The location has unfinished restaurant orders. Finish or cancel them, then remove the box. |
| “The location group “Floor 1″ is not empty! …” | Open the group and remove its rooms first. |
| A box shows the room as free although it is booked | Check Date. A booking for a room type without a room appears on no box: give it a room in the Booking window. The other computers show the change after the refresh rate. |
| “Fix Types?” when the plan opens | Rooms got another room type in Edit → Locations…. Yes moves their bookings to the new room types. |
FAQ
Can I check a guest in from the plan?
Not directly. Click the room to open the booking and use Check In there, or use the Booking Sheet, where a click on a booking shows Check In and Check Out.
Can two receptions have different plans?
Yes. Create a layout style for each in Layout style: on the computer of each reception and draw its plan there.
Does removing a room from the plan delete it?
No. Only the box is removed. The location and its bookings stay, and the room still appears in the Booking Sheet.