
The setup cards help you finish the setup of a database after the first start. They show in the Getting Started panel under the search field of the main window, when no window is open, and in the Search tab (Help → Search). Each card stands for one step, such as the company details, the locations or the users, and opens a short window for it. A card shows only while its step is not done.
The Getting Started panel
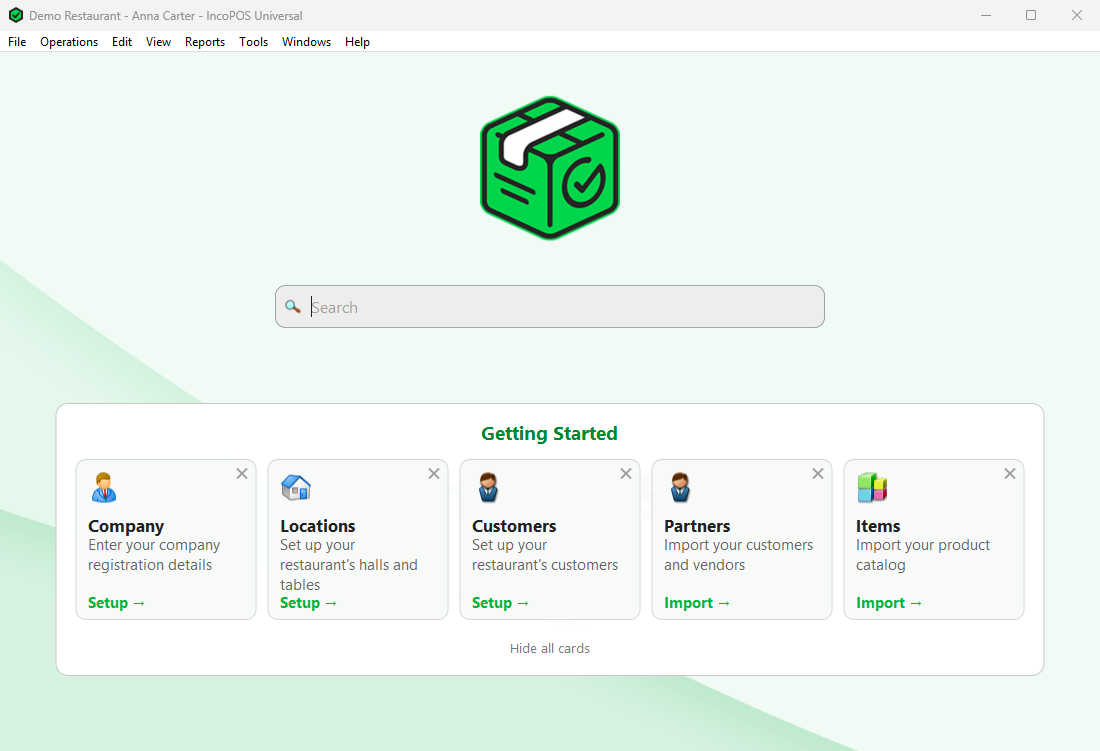
- Click a card to open its window. When you finish with Save or Close, the card hides. With Cancel it stays for later.
- The cross in the corner of a card hides that card. Hide all cards hides all of them, also those that do not fit in the row.
- Up to five cards show in a row, in the order of the table below. When a card hides, the next one takes its place.
- The panel hides when the window is too low for it. Make the window taller to see it.
To bring the hidden cards back, go to View → Show Hidden Setup Cards. Only the cards whose step is still not done come back. The hidden cards are remembered for each workstation.
The cards
| Card | Shows when | What it opens |
|---|---|---|
| Business Type | No business type is chosen. | The Business Type window. See Business Type. |
| Company | The default company of the documents has no UIC, VAT number or address. | The company window of Adding, editing and deleting companies. Fill in the details and click Save. |
| Locations | The business type is a shop, supermarket, warehouse, manufacturing, distribution, restaurant or hotel, and the database has only the default location, still named Default location. | The Locations window. See Locations. |
| Rates Types | The business type is a hotel, the rooms have types and no rate types are set. | The rate types of the hotel. See Booking Settings. |
| Customers | The business type is a shop, supermarket or restaurant, and the database has only the default partner, still named Default partner. | The Customers window. See Customers. |
| Partners | The database has only one partner. | Import Entities for partners, as in Partners. The card hides when the database has more than one partner. |
| Items | The database has only one item. | Import Entities for items, with the stock to load, as in Items. The card hides when the database has more than one item. |
| Users | The database has only the default user and it has no password, so the program starts without a login. | The Users window. See Users. |
| Devices | A business type other than warehouse, manufacturing or distribution is chosen and no device is set up. | The Devices window. See Devices and Payments. |
| Payments | A business type other than warehouse, manufacturing or distribution is chosen and no payment processor is set up. | The Payments window. See Devices and Payments. |
| Startup | No Startup page is chosen. | The Purpose window. See Startup. |
A card whose step is done, for example Partners once the database has more partners, hides by itself and does not come back.
Business Type
The window asks “What type of business are you?”. Click Retail Shop, Supermarket, Warehouse, Manufacturing, Hotel, Restaurant, Distribution or Other. The text under the buttons describes the selected type. The window has only Close, which saves the selected type.
The type decides which of the other cards show. If you have not changed your toolbar, it shows the default buttons of the type, see Customize Toolbar. For Hotel the program also adds the Deposit and Deposit discount items that the bookings use, if the database does not have them.
Locations
The Locations window makes the locations of the business in one step. The first location takes the place of Default location, so the documents already saved there stay with it. What the window offers depends on the business type.
| Business type | Options | Locations made |
|---|---|---|
| Retail Shop, Supermarket | Single store, or Multiple stores with Number of stores: from 1 to 20. | Store, or Store 1, Store 2 and so on. |
| Warehouse, Manufacturing, Distribution | The same options. | Warehouse, or Warehouse 1, Warehouse 2 and so on. |
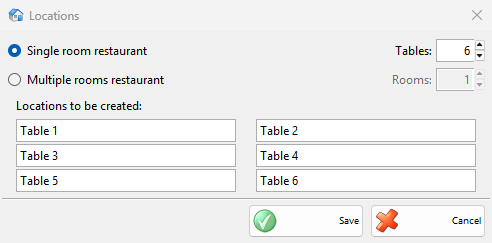
| Restaurant | Single room restaurant with Tables: from 1 to 20, or Multiple rooms restaurant with Rooms: from 1 to 8 and the Tables: of each room. | Restaurant and its tables: Table 1, Table 2, or with rooms Room 1, Room 2 with the tables Table 1A, Table 2A, Table 1B. The program also lays out the tables for the Touch Screen. |
| Hotel | Without room types, or With room types. See below. | Hotel and its rooms. |
Locations to be created: lists the names. Change any of them before you save.
For a hotel, Without room types makes the number of rooms in Rooms: (up to 100), named with Prefix: and a number, for example Room-1, with Max Adults: for each room, as one room type named after the prefix. With room types takes Number of types: (up to 10) and, for each type, Type:, the Rooms: (up to 50) and Max Adults:. The types start as Single, Double and Suite, and the rooms are named after their type, for example Double-3. Rooms to be created: shows the names. Each type becomes a room type of the bookings with its maximum number of adults, and the rooms go to the booking plan.
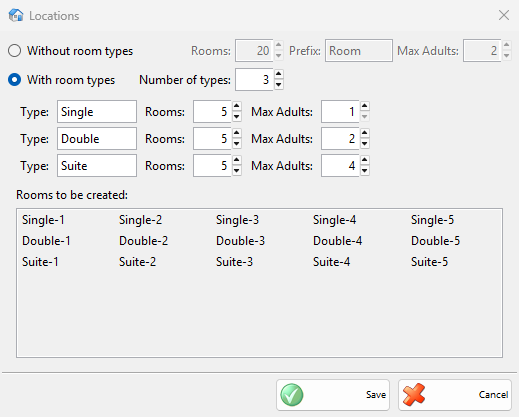
Click Save to make the locations. Enter moves to the next field and does not save. To change the locations later, use Locations.
Customers
The Customers window makes the customers of the business in one step. The first one takes the place of Default partner.
| Business type | Field | Customers made |
|---|---|---|
| Retail Shop, Supermarket | Number of separate customer profiles to create: from 1 to 20. | Default customer, Customer 2, Customer 3 and so on. |
| Restaurant | Maximum customers per table: from 1 to 20. | Customer 1, Customer 2 and so on. They become the customers of a table in the Touch Screen, where each customer is one bill. The list replaces the customers that the Touch Screen had. |
Customers to be created: lists the names. Change any of them and click Save. To change the partners later, use Partners.
Users
The Users window shows “Choose your users”. Add opens the window of a new user, see Adding, editing and deleting users. The added users show as buttons: click one to change it, or click the delete button next to it. Each user is saved as soon as you save its window, even if you then click Cancel.
Once the database has users and you are still working as the default user, the program closes the open tabs and asks you to log in, because the default user has no password.
Devices and Payments
The Devices window shows “Add your peripheral devices” with a box for each kind of device: I have a cash receipt printer, I have a kitchen printer, I have an external display connected to this computer, I have an electronic scale connected to this computer and I have a card reader connected to the serial port. Selecting a box opens the device window for that kind, see Devices. The device is saved when you save that window. Add and Remove next to a kind add another device or delete one. If a cash receipt printer is set up when you click Save, the program turns on Round prices (better compatibility with fiscal devices) in Settings.
The Payments window asks “Do you want to process credit cards?” and shows the fields of a payment processor, as in Adding, editing and deleting payment processors. A processor that you turn on is checked and saved with Save.
Startup
The Purpose window asks “What is the main purpose of this workstation?” and sets the window that opens after the login. The choices depend on the modules of the program, for example Back Office – General administration, Back Office – Dashboard graphical reporting, Front Office – Touch screen sales, Front Office – Retail sales, Quick invoices generation, Barcode lables printing and Other – Select start page: with a list of all start pages. A picture shows the selected choice. To change it later, use Startup page on the Special tab of Settings.
FAQ
Can I use a card again after I saved it?
Only while its step is not done. View → Show Hidden Setup Cards brings back, for example, Startup, but not Locations once the database has more than one location. Use the windows of the Edit menu instead.
Why does a card not show on another computer?
The hidden cards are remembered for each workstation. A card hidden on one computer can still show on another one, until its step is done.