
The New Payment Processor and Edit Payment Processor windows hold the settings of a payment processor. Open them from the Payment Processors window, which also lists the processor types, how a payment is taken and the permissions.
Add a payment processor
- Go to Edit → Payments → Payment Processors… and click New. The New Payment Processor window opens.
- Select the Processor type:. The window shows the fields of the type and fills in their default values.
- Enter the Name: and select the Payment type:.
- Fill in the fields of the type. See Fields of each type.
- Keep Enabled selected and click Save.
To change a processor, select it and click Edit. The Edit Payment Processor window has the same fields. Saving closes the connections of all the processors of the workstation, and the next payment connects again with the new settings.
Common fields
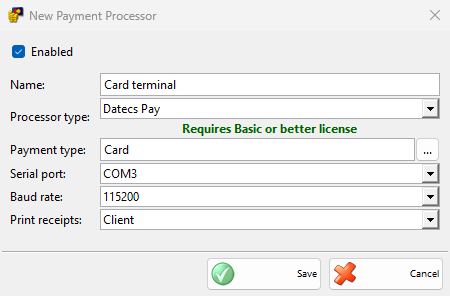
| Field | What it does |
|---|---|
| Enabled | The processor takes payments. Clear it to stop the processor and keep its settings. |
| Name: | The name in the list. It is required. |
| Processor type: | The device or the service. The window shows only the fields of the selected type, and some types show a short description and a link under the fields. |
| Requires … license | The license the type needs, under Processor type:. It is green when this workstation has the license and red when it does not. |
| Payment type: | The payment types whose payments the processor takes. It is required. Click … to choose one or more types; several types are separated by ;. Give each processor of the workstation its own types. |
Fields of each type
The labels of the connection fields come from the type. The page of each type describes its fields and their default values.
| Type | Fields |
|---|---|
| Bank Transfer (IncoCloud Bank Connector) | Only the common fields. |
| Borica | Serial port:, ECR ID:, Operator number: |
| Cashmatic | Cashmatic URL:, Username:, Password: |
| Daraja M-Pesa | Consumer Key:, Consumer Secret:, Business Short Code:, PassKey:, Account:, PartyB (optional): |
| Datecs Pay | Serial port:, Baud rate:, Print receipts: |
| Demo (allows only totals less than 10) | Only the common fields. |
| DSK Bank, FIBank, UBB | Serial port:, System ID: |
| FIBank – Spectra | Serial port:, Baud rate: |
| Hotel Link – Clock PMS+ | Base API Url:, API user:, API key:, the Item group to charge template mapping button, Receipt copies: |
| Hotel Link – Creato Solutions | API ID:, API Token:, Receipt copies: |
| Hotel Link – Fidelio / Opera M87 | An address field without a label, Port:, the Item group to sales itemizers mapping button, Receipt copies: |
| Hotel Link – IncoPOS Internal Booking | Receipt copies: |
| Hotel Link – Mews Systems | Access token:, the Hotel system service used for sales, Hotel system outlet used for external sales and Item group to accounting categories mapping buttons, Receipt copies: |
| Hotel Link – Protel | An address field without a label, Port:, Receipt copies: |
| INPAS Smart Sale | Serial port:, Baud rate:, Terminal ID: |
| Iute Credit & Wallet (Buy Now Pay Later) | API Base URL:, POS Identifier:, Salesman Identifier:, API Key: |
| Mobile Money | Receiver number: and, under Payment information, Show phone number, Show confirmation number, Show client name |
| myPOS | Serial port:, Currency code:, Print receipts: |
| Payment Server | Address: |
| Postbank – Mellon | Serial port:, ECR ID:, Serial parameters:, Operator number:, Print receipts:, Print receipts on terminal |
| SumUp – Solo Card Reader | Pairing Code:, Connect to SumUp |
| Translink REST | Service URL:, Currency code:, Terminal ID:, Print receipts:, Print receipts on terminal |
These fields work the same in every type that shows them:
| Field | What it does |
|---|---|
| Serial port: | The COM port of the computer that the terminal is connected to. It is required. |
| Baud rate: | The speed of the port. It must match the setting of the terminal. |
| Print receipts: | Which terminal receipts are printed: Client & Merchant, Client, Merchant or None. |
| Print receipts on terminal | The terminal prints its receipts itself. Cleared, IncoPOS prints them. |
Delete a payment processor
- Open the processor, clear Enabled and click Save. An enabled processor cannot be deleted.
- Select one or more processors in the Payment Processors window and click Delete.
- Answer “Do you want to delete payment processor “…”?” with OK.
The saved payments keep their amounts and payment types.
Troubleshooting
| Message | Solution |
|---|---|
| “Payment processor name cannot be empty!” | Enter Name:. |
| “No payment types selected!” | Select at least one Payment type:. |
| “Payment processor with this name already exists! Do you want to continue?” | A warning. No returns to the field. |
| “Please fill out all the fields!” | A required field of the type is empty, for example Serial port:. The cursor goes to it. |
| “The payment processor “…” cannot be deleted, because it is in use.” | Clear Enabled, save, then delete the processor. |