The Kiosk module is a self-service solution for customers using touch screen technology. It allows customers to order and pay independently without staff involvement, making it suitable for restaurants, cafeterias, stores, and other retail locations.
The module offers complete visual design customization, multi-language support, customer card integration, product weight validation, and different operational modes.
1. License Requirements
Using the Kiosk module requires a license depending on the selected operational mode:
– “Order” Mode – requires Pro license or higher
– “Sale with Card” Mode – requires two Pro licenses
– “Sale with Card + Weight Validation” Mode – requires three Pro licenses
Note: When operating without a valid license, the system runs in demo mode with a watermark on the screen.
2. Getting Started
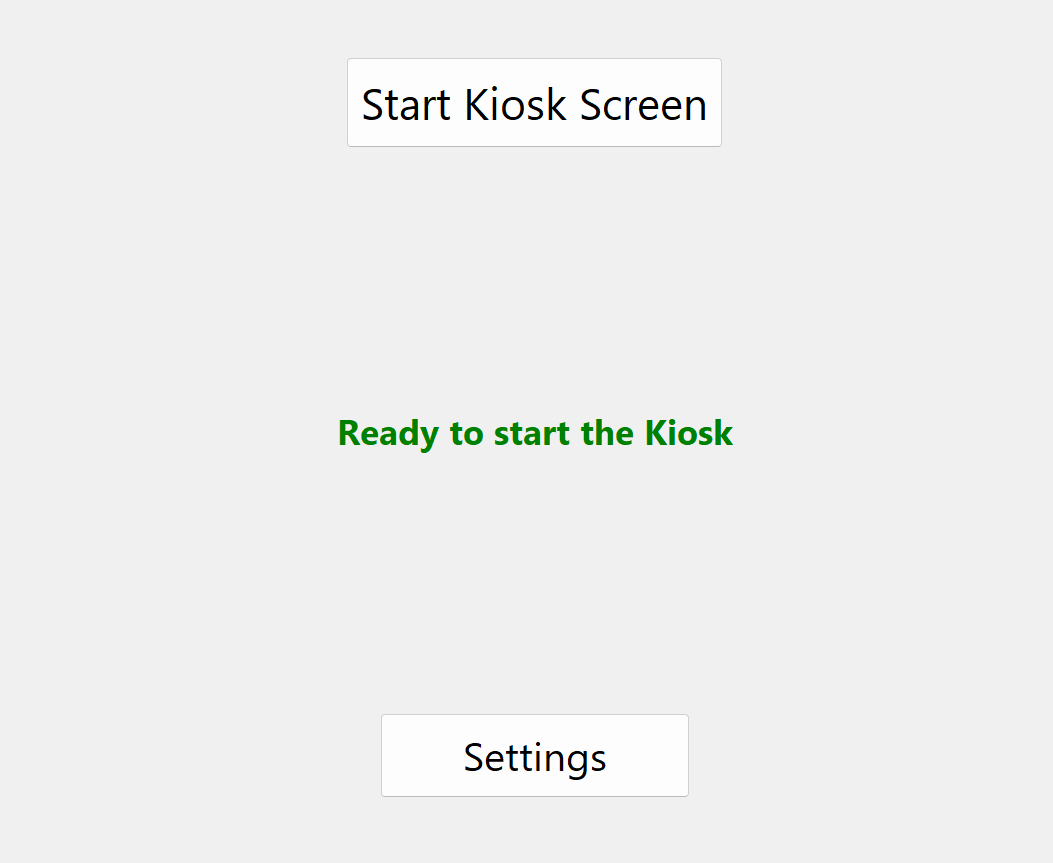
The Kiosk module is launched from the IncoPOS main menu:
Operations → Sale → Kiosk
After launching, a settings dialog opens where you can configure the kiosk profile or start an already configured kiosk in full-screen mode.
3. Configuration
Kiosk configuration is performed through a profile system, which allows storage of multiple configurations for different usage scenarios.
3.1 Creating a Profile
To create a new kiosk profile:
1. Open Operations → Sale → Kiosk
2. Click on Settings
3. Select New Profile from the dropdown menu or click the create button
4. Enter a profile name (e.g., “Kiosk – Restaurant”, “Kiosk – Store”)
5. Configure the settings according to your needs
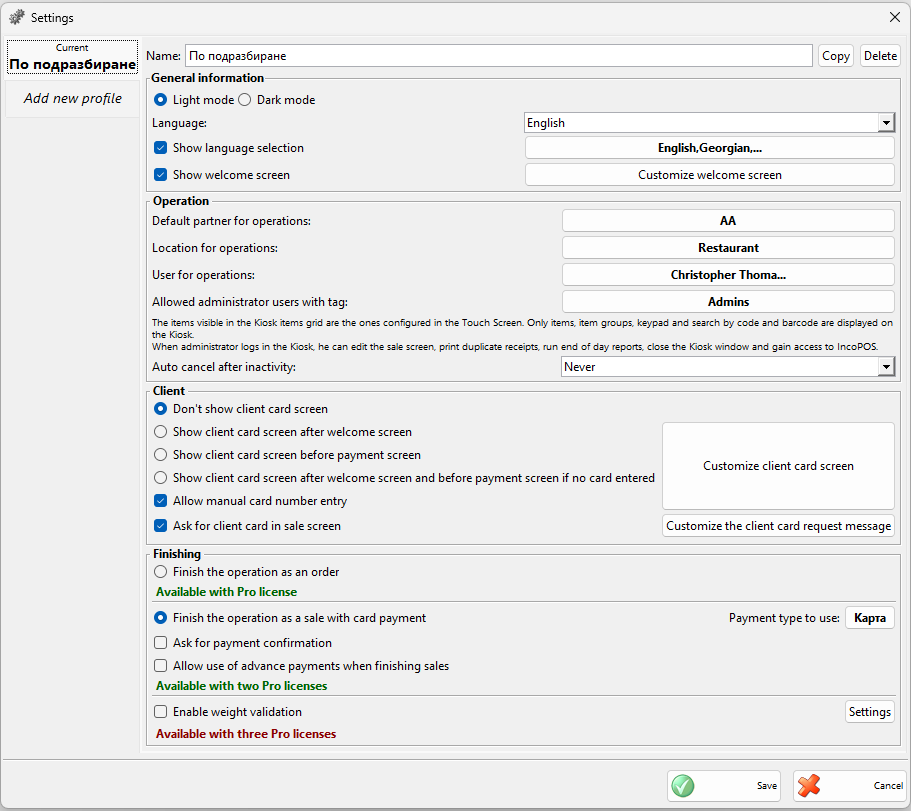
3.2 General Settings
Screen Mode:
– Light Mode – suitable for well-lit environments
– Dark Mode – more comfortable for the eyes in low-light conditions
Language: Selection of the primary language for the interface (can select “Default language” for automatic detection)
Show Language Selection: Enable the option for customers to choose a language at startup
Available Languages: List of languages that can be selected when language selection is shown (up to 10 languages)
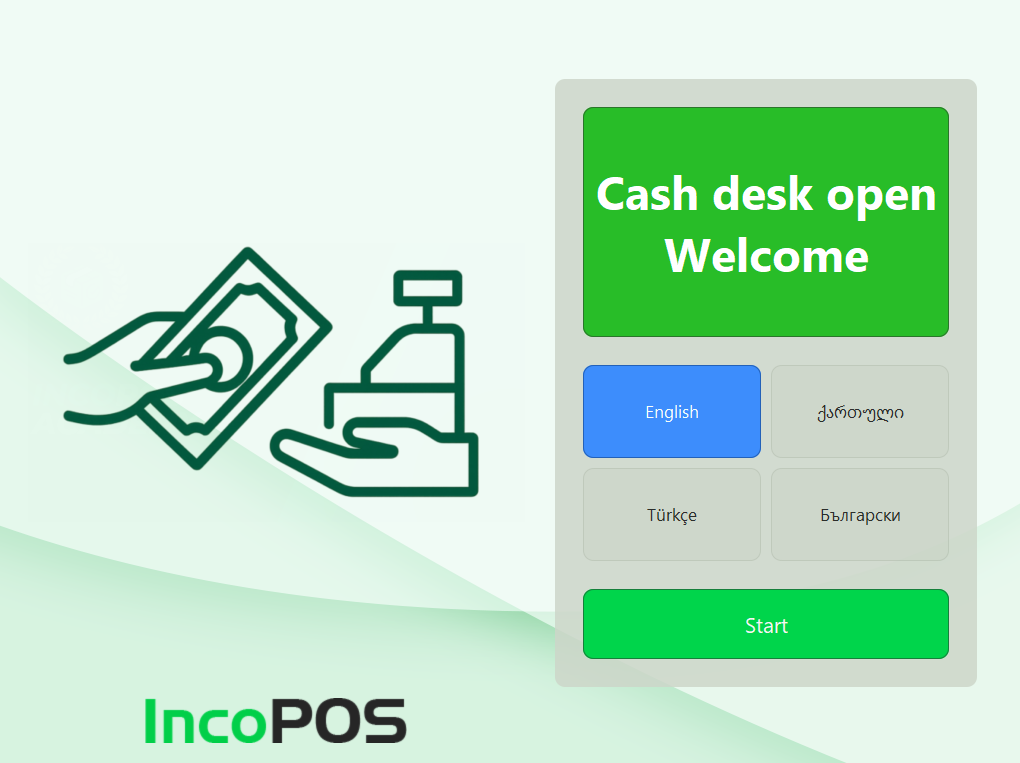
Show Welcome Screen: Enable/disable the greeting screen at startup
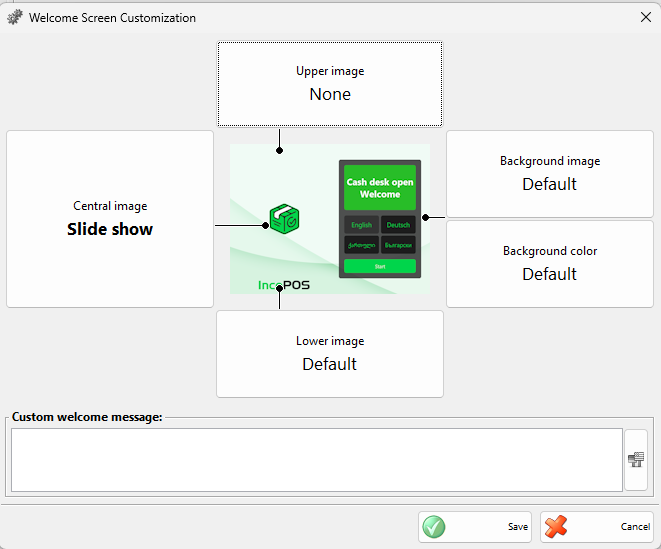
Customize Welcome Screen: Button to access detailed welcome screen settings (images, colors, messages)
3.3 Welcome Screen Settings
The welcome screen is the first thing customers see when entering the kiosk. It can be customized with images, colors, and messages.
Show Welcome Screen: Enable/disable the greeting screen
Custom Message: Greeting text displayed on the screen
Images:
– Upper Image – banner at the top of the screen
– Central Image – main image in the center (supports slideshow)
– Lower Image – banner at the bottom
– Background Image – background for the entire screen
Slideshow Settings:
– Slideshow Speed – time to display each image in milliseconds (default 5000 ms = 5 seconds)
– Effect – smooth transition between images (CrossFade)
Colors: Customize the background color of the screen
Note 1: You can use the built-in images (light/dark mode) or upload your own.
Note 2: Order initiation can also be done by directly scanning a product barcode without pressing the “Start” button.
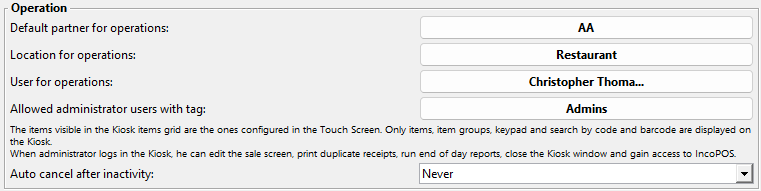
3.4 Operation Settings
Default Partner for Operations: The customer to which orders without a customer card are registered
Location for Operations: Warehouse location from which items are issued
User for Operations: The user on whose behalf operations are performed
Allowed Administrator Users with Tag: Tag that determines which users have administrator access via customer card
Auto Cancel After Inactivity: Time after which the order is automatically cancelled due to lack of activity. Available values: Never, 1 minute, 2 minutes, 3 minutes, 4 minutes, 5 minutes (default), 10 minutes, 20 minutes, 30 minutes
Note: Before cancellation, a warning is shown 10 seconds before time expires.
3.5 Customer Card Settings
The kiosk supports integration with customer loyalty cards and special pricing.
When to Request Card:
– Never – customer card is not required
– After Welcome Screen – immediately after the greeting screen
– Before Payment – before order finalization
– Both – both after welcome screen and before payment
Allow Manual Card Entry: Enable the option to enter card number via virtual keyboard
Ask for Card in Sale Screen: Show button to scan card during shopping
Custom Messages: Texts prompting for card scanning at different stages

3.6 Finishing Settings
Finish Mode:
– Finish the Operation as an Order – creates a restaurant order without payment (suitable for queue/kitchen)
– Finish the Operation as a Sale with Card Payment – creates a sale with integrated payment via POS terminal
Payment Type to Use: Selection of payment type used in “Sale with Card Payment” mode
Ask for Payment Confirmation: Show confirmation dialog before processing card payment
Allow Use of Advance Payments When Finishing Sales: Enable the option to use bonus points/advances
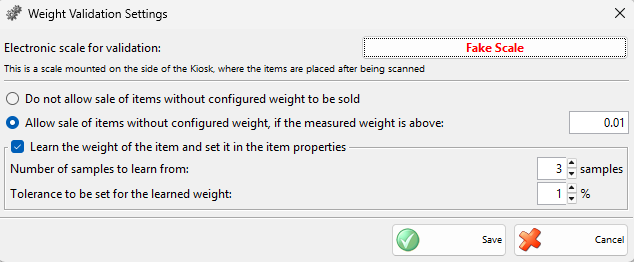
3.7 Weight Validation Settings
Weight validation is a feature that checks whether the weight of ordered items matches expectations using an electronic scale. This helps prevent fraud.
Enable Weight Validation: Turn on the feature
When this feature is enabled, a dialog with additional settings opens:
Validation Scale: Selection of device (electronic scale) for measuring
Accept Items Without Weight: Allow items that don’t have a defined weight
Minimal Accepted Weight: Minimum item weight (default 0.01 kg)
Auto-Learn Weight: System automatically remembers item weights
Auto-Learn Weight Samples: How many times the item must be measured to remember the weight (default 3)
Auto-Learn Weight Tolerance: Acceptable deviation percentage when learning weight (default 1%)
Note: Weight validation requires a three Pro licenses.
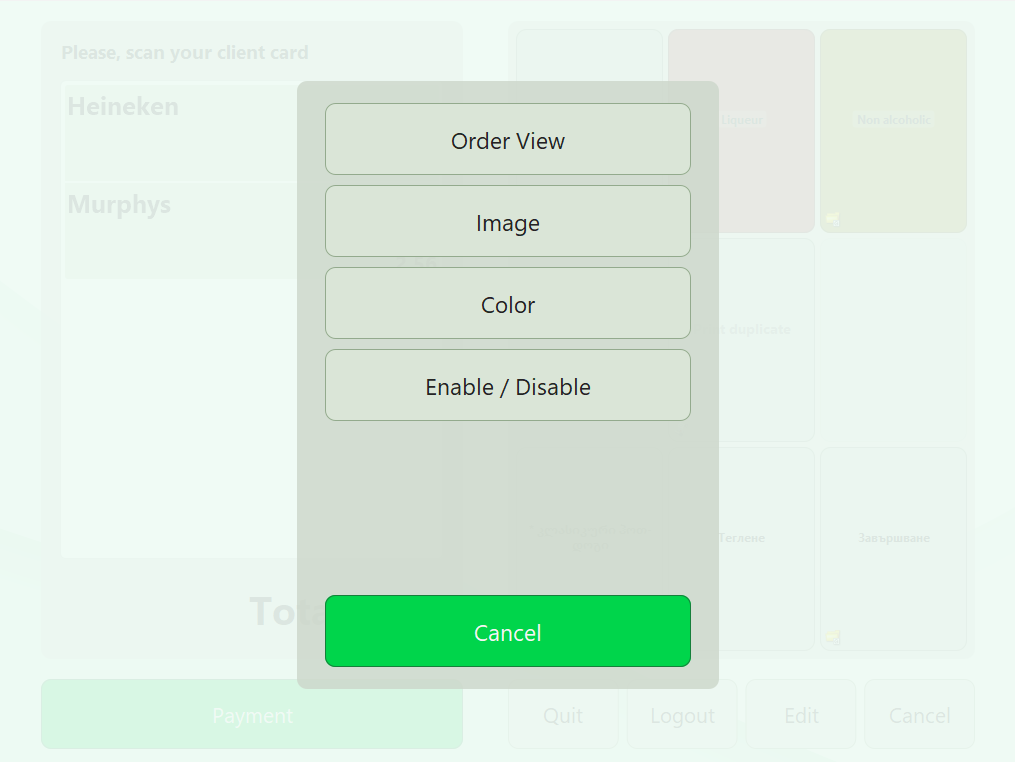
3.8 Item Configuration
The item layout in the kiosk uses the same customization system as the touch screen.
To edit the item layout:
1. Enter the kiosk as administrator (by scanning an administrator card when long-pressing the “Help” button)
2. Click the Edit button in the lower left corner
3. Edit mode is activated – you can:
– Add new buttons for items or groups
– Move existing buttons
– Delete buttons
– Change button text and images
– Create a hierarchical structure of groups and subgroups
4. When finished, press Done to save changes
Note: The item layout is stored in the Entity system and is shared across all kiosk profiles.
4. Usage
4.1 Standard Workflow (Customer)
Step 1: Welcome Screen
The customer sees the greeting screen with the option to select a language (if enabled). They press the Start button or scan a product barcode to start directly.
Step 2: Card Scanning (if configured)
If card requirement is set after the welcome screen, the customer scans or enters their customer card number. They can also continue without a card via the Continue Without Card button.
Step 3: Item Selection
The customer selects items by:
– Pressing buttons in the hierarchical group structure
– Scanning barcodes
– Entering quantities via the numeric keypad
Selected items are shown in the left panel with the receipt.
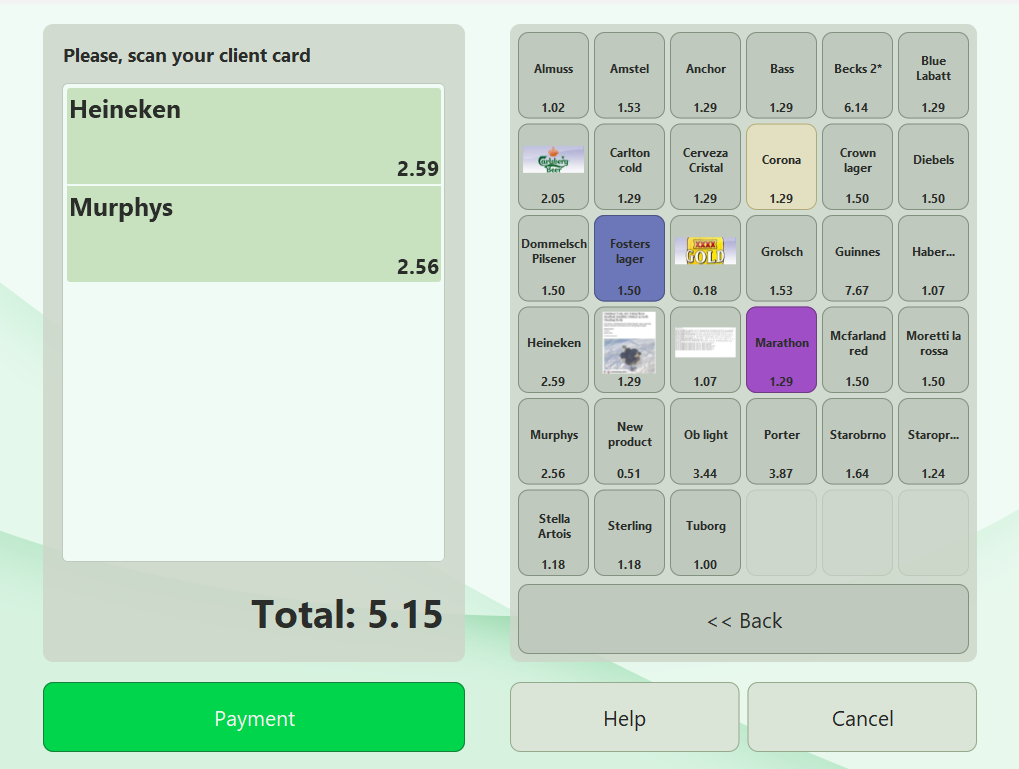
Step 4: Finalization
After completing the selection, the customer presses the Done button (or Payment depending on the mode).
In “Order” Mode:
– The order is saved
– A receipt is printed (if configured)
– A success message is displayed
In “Sale with Card” Mode:
– Weight validation is performed (if enabled)
– Ask to use bonus points (if available)
– Payment confirmation dialog is shown
– Card payment is processed via POS terminal
– Fiscal receipt is printed
– Success message is displayed
Step 5: Completion
After successful completion, the system automatically returns to the welcome screen for the next customer.
4.2 Administrator Functions
Administrators have access to additional functions via a special customer card.
Administrator Login:
1. Press and hold the Help button for 2-3 seconds
2. Scan administrator card (user with tag defined in settings)
3. Administrator mode is activated
Note: The user must have a card number entered in the system.
Available Administrator Functions:
– Edit – edit item layout
– Corrections – access to sales/order corrections
– Reports – daily reports (operator/manager)
– Duplicate Receipt – reprint last receipt
– Exit – leave the kiosk
– Logout – log out administrator (return to customer mode)
4.3 Order Cancellation
The customer can cancel the order at any time by pressing the Cancel button. When cancelling:
– A confirmation dialog is shown
– The order is deleted
– The system returns to the welcome screen
Auto-Cancellation: During inactivity, the system shows a warning 10 seconds before automatic cancellation. The customer can continue or confirm cancellation.
4.4 Removing an Item
To remove an item from the order:
1. Press the Cancel button once
2. The last added item is removed from the receipt
3. To remove again, press Cancel again
To remove a specific item, click on it in the receipt (if enabled).
5. Advanced Features
5.1 Weight Validation System
When weight validation is enabled, the system automatically learns and checks item weights.
Learning Process:
1. When scanning an item for the first time that doesn’t have a remembered weight, the system requests placement on the scale
2. Weight is measured
3. The process repeats the specified number of times (default 3 times)
4. Average weight with tolerance is calculated
5. Weight is remembered for future use
Validation Process:
1. When finalizing the order, the customer places all items on the scale
2. The system compares the measured weight with expected weight (sum of remembered weights)
3. If there’s a discrepancy, a warning is shown
4. An administrator can allow continuation or cancel the order
Note: This feature is suitable for stores with self-packaged goods, cafeterias, fast food, and other places where weight control is important.
5.2 Multi-Language Support
The kiosk supports up to 10 languages simultaneously with real-time switching capability.
Configuring Languages:
1. In profile settings, select Show Language Selection
2. Click on Available Languages
3. Select desired languages from the list (bg, en, ru, ro, and others)
4. Save the profile
Usage:
– Language selection buttons are shown on the welcome screen
– Customer selects language by touching
– All messages, buttons, and texts switch to the selected language
– Language remains active until the end of the order
5.3 Loyalty Program Integration
When advance payments usage is enabled, the kiosk supports:
– Display of available customer bonus balance
– Automatic offer to use bonus points
– Partial or full payment with bonuses
– Topping up the remainder with a card
The customer can choose whether to use bonuses or pay entirely with a card.
5.4 Theme Customization
The kiosk offers two ready-made themes and customization options:
Light Mode:
– White/light background
– Dark text
– Pastel button colors
– Suitable for well-lit environments
Dark Mode:
– Dark background
– Light text
– Saturated button colors
– Less tiring for eyes during extended use
Customization:
– Custom images for all sections
– Custom background colors
– Adjustable font size
– Receipt width setting
6. Hardware Integration
The kiosk supports the following peripheral devices:
– Barcode Scanners – 1D and 2D barcodes (USB, Bluetooth)
– NFC/RFID Card Readers – for customer and administrator cards
– Electronic Scales – for weight validation (USB, serial port)
– Fiscal Printers – for receipt printing
– POS Terminals – for card payment processing
– Customer Displays – for showing information to the customer
All devices are configured through IncoPOS’s standard device management system.
7. Frequently Asked Questions
Question: Can the kiosk work offline?
Answer: Yes, the kiosk can work with a local database (SQLite). When connection is restored, data is synchronized.
Question: How many kiosks can work simultaneously?
Answer: There is no limit. Each kiosk is a separate workstation with individual configuration.
Question: How do I change images on the welcome screen?
Answer: Open profile settings, select the corresponding section (upper/central/lower image), and upload the new image.
Question: What happens if payment is interrupted?
Answer: If there’s a payment error, the order remains active and the customer can try again or call for help.
Question: Can a kiosk be used without a touch screen?
Answer: Theoretically yes, but it’s not recommended. The kiosk is optimized for touch screens.
Question: How are kiosk sales reported?
Answer: All sales and orders are recorded in the standard system and included in IncoPOS reports and statements.
8. Conclusion
The IncoPOS Kiosk module is a powerful solution for sales automation and operational cost reduction. With rich customization options, multi-language support, and hardware integration, it’s suitable for a wide range of businesses – from restaurants and cafeterias to stores and shopping centers.
For more information and technical support, visit incopos.com or contact our support team.